Hi!
For this post, I will write about an awesome feature – group policy – that allows IT admins to control user computer configurations all from one place (a.k.a. server). I am familiar with the term, something I learned from a workshop years ago, but it wasn’t until a week ago that I’ve gotten to use it at work. It is a pretty neat feature; it saves time (no need to inspect each computer one by one anymore) and can do great damage (great for IT admins, not so great for the end users).
Group policy can be used for just about anything – enabling firewall, disabling jump drives, even installing and assigning software in all of the computers!
Last week our IT Security Team was facing a dilemma – how to prevent users from installing non-approved software on their laptop. The solution? Removing their local admin rights and changing them into normal “Users”. Yes, the users will scream and shout, but it will prevent any malware from getting into the system..
Okay, let’s get to it!
Goal: To create a GPO (group policy object) that will allow only a handful of users to become local admins while the rest are normal users.
There are two parts to this tutorial: creating the security group (Local Admins) and creating the GPO to only allow the security group to have local admin privileges.
Creating the security group
- Open Active Directory Users and Computers
- Select your Security Group OU
- Right Click and select New > Group
- Give the Group a name (for this tutorial, I am using “Local Admins”)
- Add the users who can have local admin rights to this Group
Creating the GPO
- Open Group Policy Management Console.
- Right click the OU that contains the systems you want to set the local admin on
- Select “Create a GPO in this domain, and Link it here…”
- Name the GPO. I am using “Set Local Administrators”
- Right Click the GPO and select Edit.
- Set the following:
- Computer Configuration\Policies\Windows Settings\Security Settings\Restricted Groups
- Right Click and select “Add Group…”
- Select browse and add the Administrators group
- Select OK
- Double click Administrators
- Select Add for “Members of this group:”
- Browse and find your security group. I added “Local Admins” and “Domain Admins”
- Close window
- Right Click (still on the Restricted Groups page) and select “Add Group…”
- Select browse and add the Local Admins group
- Select OK
- Double click Local Admins
- Select Add for “This group is a member of:”
- Browse and add Administrators
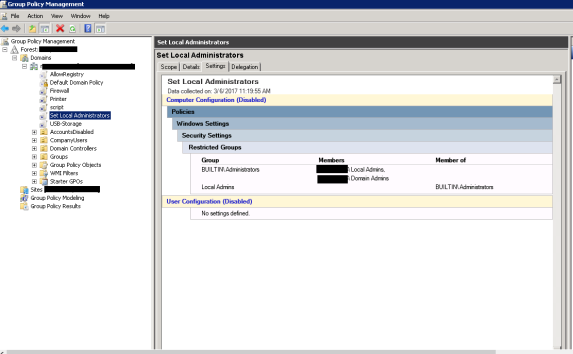
So, it should look like this once you have configured everything:
References:
- http://www.dannyeckes.com/create-local-administrator-security-group-gpo/
- https://community.spiceworks.com/topic/387138-remove-domain-users-from-local-administrators-group
